WAIT!
Don’t leave empty-handed! Grab this FREE survival & DIY guide!
Learn how to build a pro-level workshop, slash bills, and prep for any crisis even if you’re a beginner.

Get prepped, powered, and self-reliant starting today.


Build a DIY Water Filter at Home for Clean Drinking Water

Clean water isn’t always guaranteed, especially in emergencies or off-grid situations. A homemade water filtration system can be a practical, low-cost solution when commercial options aren’t available. With simple materials like sand, gravel, and activated charcoal, you can create a basic but effective filter to remove contaminants.
These DIY setups aren't just practical—they're sustainable and cost-effective. Whether you need backup filtration during power outages or want cleaner well water, a homemade water filtration system is a smart solution. The best part? You likely have most of the supplies already.
Watch this practical DIY water filter demonstration to see how simple it can be. Then we'll walk through the steps to build your own.
Understanding Water Contaminants
Before building a homemade water filtration system, it’s essential to know what you’re up against. Water can carry invisible threats that make it unsafe—bacteria, sediment, and chemicals each pose different risks. A good filter must address these contaminants effectively.
Bacteria and Viruses
Pathogens like E. coli, giardia, and hepatitis A thrive in untreated water. These microscopic invaders enter water through sewage, animal waste, or contaminated runoff. The health risks? Diarrhea, dehydration, and in severe cases, life-threatening infections. If you’ve ever gotten sick after drinking from a questionable stream, bacteria or viruses were likely the culprits.
Sediment and Particulates
Dirt, sand, and rust don’t just cloud your water—they can clog pipes, damage pumps, and sometimes carry bacteria. Visible debris is easy to spot, but finer particles can slip through without proper filtration. These sediments often come from:
- Soil erosion
- Aging pipes
- Floodwater runoff
A simple sediment filter, like layered sand and gravel, traps these particles before they reach you.
Chemical Pollutants
Chemicals like chlorine, lead, and pesticides don’t always smell or taste bad, but they can silently harm your health over time.
- Chlorine (used to treat municipal water) dries skin and may irritate eyes.
- Lead (from old pipes) causes neurological damage, especially in children.
- Pesticides seep into groundwater and have been linked to long-term illnesses.
Activated charcoal is a powerhouse for removing many chemicals because its porous structure traps contaminants while letting clean water flow through.
Whether your water source is a river, well, or tap, understanding these contaminants helps tailor your filter for maximum safety.
For a deeper look at waterborne threats, the Water Quality Association provides a detailed breakdown. The EPA also identifies chemical contaminants you might encounter.
Basic Principles of Water Filtration
A homemade water filtration system works by targeting different types of contaminants through layered filtration methods. Whether you're filtering muddy river water or improving the taste of tap water, understanding these core principles ensures your setup effectively removes particles, chemicals, and biological threats.
Mechanical Filtration
Mechanical filtration acts as the first line of defense, trapping larger particles like dirt, sand, and debris. Materials such as sand, gravel, and fabric create physical barriers that strain out impurities as water passes through. Think of it like a sieve—coarse gravel catches bigger pieces while finer sand blocks smaller sediment.
- Gravel removes twigs, leaves, and large debris.
- Fine sand captures silt and smaller particles.
- Cloth or cotton polishes the water, catching microscopic sediments.
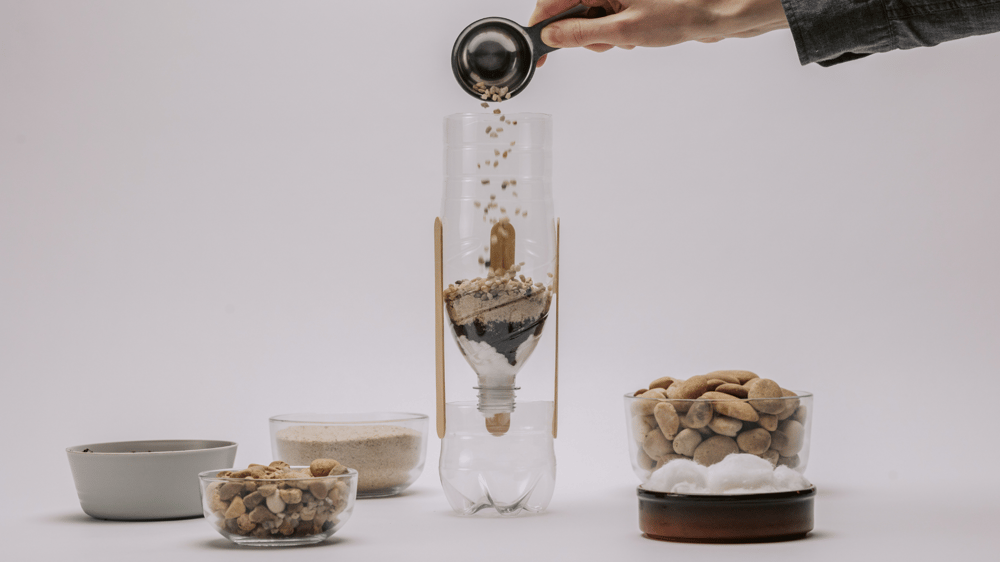
Layering these materials from coarse to fine maximizes efficiency. Without mechanical filtration, other stages can clog or fail prematurely.
For example, NASA’s Make a Water Filter project demonstrates how layering materials mimics natural filtration processes.
Activated Charcoal
Activated charcoal is the powerhouse for removing chemicals, odors, and some heavy metals. Its porous surface attracts and traps contaminants through a process called adsorption—not absorption. This means chemicals stick to the charcoal's surface instead of being soaked up.
Common contaminants addressed by activated charcoal:
- Chlorine
- Pesticides
- Volatile organic compounds (VOCs)
- Some heavy metals like lead
Because of its neutral effect on water's mineral content, it also enhances taste and clarity. Just remember, charcoal doesn’t remove bacteria or viruses, so pairing it with other filtration methods is key.


Biological Filtration
Some advanced homemade systems use natural organisms to break down harmful bacteria and organic matter. While not always necessary for basic setups, biological filtration can be useful in long-term or larger-scale solutions.
- Slow sand filters encourage beneficial microbial growth on the sand's surface, which digests pathogens.
- Wetland-style systems mimic natural purification with aquatic plants and biofilms.
These methods take time to establish but provide low-maintenance, sustainable options for continuous water treatment.
DIY Water Filtration Designs
When building a homemade water filtration system, different setups serve different needs. Some are quick and portable, while others work best for long-term use. Each design targets specific contaminants—whether you’re filtering muddy river water or improving questionable tap water. Here are three practical DIY methods you can build with basic materials.
Gravity-Fed Bucket Filter
A gravity-fed bucket filter is simple, effective, and requires minimal supplies. It works by letting water trickle through layers of filtration media, removing sediment, bacteria, and some chemicals.
Materials needed:
- Two food-grade plastic buckets (5-gallon works best)
- Spigot or hose for the bottom bucket
- Fine sand (pre-washed)
- Coarse gravel (pea-sized or larger)
- Activated charcoal (granular, not powder)
- A drill with a small bit
- Mesh or fine cloth (cheesecloth or a cotton bandana)
Assembly steps:
1. Drill drainage holes. In the bottom of the first bucket, drill several small holes for water to flow through.
2. Layer filtration media. Start with a mesh cloth at the bottom to keep sand from leaking. Add activated charcoal (1-2 inches), then fine sand (4-6 inches), and top it with coarse gravel (2-3 inches).
3. Set up the collection bucket. Place the second bucket below with a spigot installed near its base for easy water access.
4. Test the flow. Pour water into the top bucket. It should drip slowly—if too fast, add more fine sand.
This system removes sediment, some bacteria, and improves taste. For pathogens, consider boiling the filtered water or adding iodine tablets.
BioSand Filter
A biosand filter mimics natural slow-sand filtration, using beneficial microbes to break down bacteria. It’s ideal for households needing a long-term solution.
Construction steps:
1. Build a concrete or plastic container. A tall, narrow design (like a PVC drum) ensures water moves slowly through sand.
2. Add layers. Fill the bottom with drainage gravel (1 inch), then a separator layer (thin mesh), followed by fine sand (18-24 inches). The top layer develops a biofilm that traps and digests harmful organisms.
3. Prime the filter. Pour water daily for 2-3 weeks to establish the biofilm. Once matured, it removes up to 90% of bacteria.
Maintenance:
- Keep the sand moist; drying kills the biofilm.
- Occasionally stir the top sand layer to prevent clogging.
- Clean the spout regularly to avoid contamination.
Biosand filters require patience but provide reliable, low-maintenance filtration.
Plant-Based Filtration
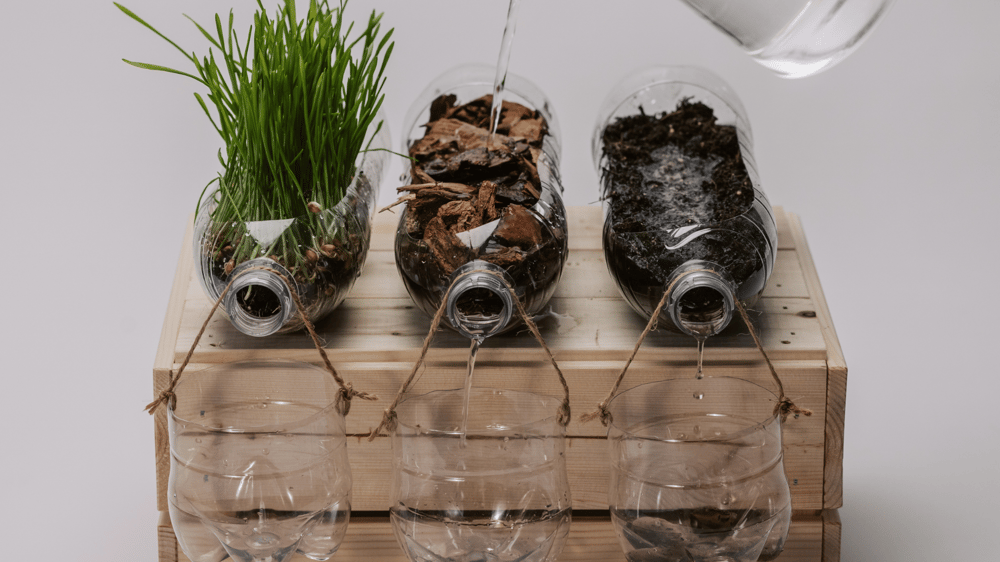
In outdoor or survival settings, plants like cattails, bamboo, and water hyacinths can act as natural purifiers. Their roots host microbes that break down pollutants while absorbing heavy metals.
Setup options:
- Wetland-style filter: Dig a shallow trench, line it with gravel, and plant water-purifying species. Channel water through it slowly.
- Bamboo charcoal filter: Burn bamboo into charcoal, crush it, and use it like activated carbon in a bucket filter.
While plant-based systems take time, they’re sustainable for long-term use in gardens or off-grid properties. Pair them with mechanical filtration for better results.
Each design has strengths—choose based on your needs, materials, and water source. Adapt and combine methods for the best outcome.
Maintenance and Troubleshooting
A homemade water filtration system only works well if it’s properly maintained. Over time, filter layers collect contaminants and lose effectiveness. Regular checks and simple upkeep ensure clean, reliable water. Here’s how to keep your system running smoothly.
Cleaning and Replacing Materials
Each layer in your filter has a lifespan. Cleaning or replacing them prevents clogs and keeps water safe.
- Sand and gravel – Rinse them every two weeks if used heavily, or monthly for occasional use. Use clean water to flush out trapped debris. If the sand turns dark or smells, replace it.
- Activated charcoal – Swap it every 2-3 months, as it loses its adsorption ability once saturated. In high-contaminant water, change it monthly.
- Cloth or mesh – Clean reusable fabric filters with hot water weekly. Replace if frayed or discolored.
For multi-stage systems like bucket filters, disassemble the layers and rinse them separately. Let everything dry before reassembly to prevent mold.
Signs of a Failing System
Even with regular care, filters wear out. Watch for these warning signs:
- Slow flow rate – Clogged layers force water to trickle instead of drain.
- Cloudy or discolored water – Means sediment or charcoal isn’t filtering properly.
- Unusual tastes or smells – Suggests bacterial growth or exhausted charcoal.
- Visible debris – If particles slip through, your gravel or sand layer needs replenishing.
If you notice any of these, inspect each layer. Clean or replace problem materials immediately. For persistent issues, reevaluate your filter design—your water source may have changed.
Always test filtered water periodically if possible, especially after maintenance. Simple test strips for bacteria or pH can confirm your system’s effectiveness.
Comparing DIY and Commercial Filters
Building a homemade water filtration system offers flexibility and cost savings, but how does it stack up against store-bought options? Both have strengths and limitations, depending on your needs. Let’s break down the key differences in cost, accessibility, and performance.
Cost and Accessibility
DIY systems win when it comes to affordability. With basic materials like sand, gravel, and activated charcoal, you can assemble an effective filter for under $50. Many components are easy to find:
- Sand and gravel – Often free or low-cost from landscaping suppliers.
- Activated charcoal – Sold in bulk at aquarium or hardware stores.
- Plastic buckets or containers – Repurposed from household items.
Commercial filters, on the other hand, range from $20 for basic pitcher filters to $300+ for advanced reverse osmosis systems. They also rely on proprietary parts, meaning replacements can be costly and harder to source during emergencies.
The trade-off? DIY filters require time and effort to build, while commercial products offer instant plug-and-play convenience.


Effectiveness and Reliability
Commercial filters excel in consistency. Brands like Berkey or Brita rigorously test their systems to remove specific contaminants, backed by certifications. For example:
- Microbiological safety – Many commercial filters meet NSF/ANSI standards for pathogen removal.
- Chemical reduction – Activated carbon in premium filters targets heavy metals and VOCs more efficiently than homemade setups.
- Flow rate – Engineered designs maintain steady water pressure without clogging.
Homemade systems can match some of this performance but require fine-tuning. A well-built biosand filter removes 90% of bacteria, while layered bucket filters handle sediment and improve taste. However, DIY setups lack standardized testing, so results vary based on materials and assembly.
For long-term reliability, commercial filters often last years with minimal maintenance. DIY systems need frequent cleaning and material replacements to stay effective.
In short, DIY filters work best for temporary or budget-friendly solutions, while commercial filters deliver tested, low-maintenance performance. Choose based on your priorities: cost and adaptability versus convenience and precision.
Conclusion
A homemade water filtration system gives you control over one of life’s essentials—clean water. Whether you need a backup for emergencies or a sustainable solution off-grid, these DIY methods are practical and cost-effective. Start small with a basic bucket filter, then refine your setup as you learn.
Clean water shouldn’t be left to chance. With simple materials and a little effort, you can build a reliable system that meets your needs. Try it today. The confidence and security it brings are worth every minute spent.
Have you tested a DIY filter? Share your experience or ask questions in the comments. Your insights could help others take the first step toward safer water.





See other posts like this one:





Your home for DIY projects, off-grid solutions,
and real-world craftsmanship.
Contact
support@charliesworkshop.net
© 2025 Charlie's Workshop